Kuthchemes Onslaught
When Funcom released the new Kuthchemes Onslaught content in late April, they posted an unusually good and thorough forum thread with an overview of the various mechanics, bosses, weapons, gems etc. connected with this new game mode. Thus my present blog post will mostly be about things that are not mentioned in that forum thread.
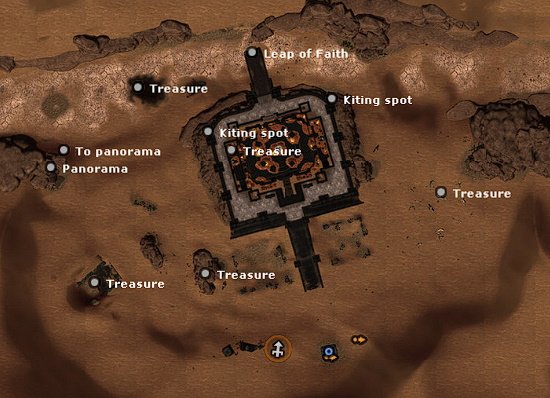
To begin with, here’s a map showing the locations of the treasure chests, the leap of faith, and the panorama:
Kuthcheman gems
These exist in rare (blue), epic (purple) and legendary (orange) variants. The first two drop from wave 1 onwards, the legendary ones from wave 15. Funcom’s forum thread says somewhere that gems have a higher chance of dropping in higher waves; but I didn’t really get this impression in my farming. There seems to be no great shortage of purple gems dropping on waves 1–5, and you can perfectly well have long dry periods of no gems at all on waves 21–25. But I haven’t collected any statistics about this, so I can’t be sure.
The stats on the gems are as follows (all numbers are given in triples, corresponding to blue/purple/orange gems):
Kuthcheman Gem of Protection: 250/500/750 armor, 25/50/75 protection
Kuthcheman Gem of Wisdom: 5/10/15 wis, 20/40/60 hit rating
Kuthcheman Gem of Dexterity: 5/10/15 dex, 20/40/60 hit rating
Kuthcheman Gem of Intelligence: 5/10/15 int, 20/40/60 hit rating
Kuthcheman Gem of Strength: 5/10/15 str, 20/40/60 hit rating
Kuthcheman Gem of Constitution: 5/10/15 con, 20/40/60 hit rating
The protection gem is probably the most attractive of these, especially when combined with the tank shield (which has a lot of armor by itself). The constitution gem is a worthless joke. The others are OK if not particularly exciting.
I was unusually lucky with the protection gems. The first time I saw a legendary protection gem drop, I won it with a need(100) roll 🙂 So far I don’t think I’ve seen more than four or five of them drop, after doing a little over 1900 waves at wave 15 or higher.
Onslaught gems
I seem to remember than on very rare occasions, these gems can drop from (mini)bosses in Kuthchemes, but for the most part you’ll have to buy pouches from the vendor in front of the Old Tarantia library; when you open a pouch, you get a random Onslaught gem whose rarity (blue, purple, orange) matches that of the pouch.
These gems have names of the form X Onslaught Gem [of Y]. Such a gem has one stat depending on X, plus T6 buffs depending on Y:
If X = Fatal, the gem has 120 (if blue/purple) or 240 (if orange) fatality rating.
If X = Ferocious, it has 20 (if blue/purple) or 40 (if orange) ferocity.
Y = one T6 blessing if purple, two if orange; none if blue.
Thus many Onslaught gems are fairly unattractive due to strange combinations of T6 blessings, or because they are fatal while most people want ferocious ones. On the other hand, a few of the most attractive ones (mostly legendary ferocious gems with Ashur + another blessing) have been known to sell for ungodly amounts of money.
On the whole I think it’s a great idea that Funcom made all the new gems tradable; previously trading was getting a bit moribund since there wasn’t much to trade; all the good gear was bind-on-pickup (and Funcom hadn’t updated crafting since 2008 or so). I guess this is why these new gems fetch such high prices; there’s a good deal of money in the game but nothing else to spend it on. I myself made more than 11k gold selling gems, and I know I’m far from the biggest profiteer in this area.

I’d be glad to spend some of this money on some good gems, but sadly you rarely see them for sale on the trader.
Kuthcheman weapons
The new vendor sells weapons for all classes, costing 2000 relics for one-handed and 4000 relics for two-handed ones. They are mostly very similar to T6 weapons in terms of stats, often even a little better, and they get better still once you put gems in them. The weapons don’t have any T6 blessings, so you have to put in an Onslaught gem to get those.*
[*I wonder if the assassins are at a bit of a disadvantage here; their T6 main-hand dagger has two blessings and the T6 offhand dagger has one, and all three of them actually count; but here, the Kuthchemes main-hand dagger has an Onslaught gem slot (where the gem can provide you with two blessings) while the Kuthchemes offhand dagger has no Onslaught gem slot, so you get a total of two blessings from your weapons rather than three as with T6 weapons.]
In addition to the usual stats, the Kuthchemes weapons also have ferocity; 100 on one-handed and 200 on the two-handed ones. With all this ferocity, my guardian’s Cry of Havoc now hits 6 targets instead of 4 — rawr, I’m so OP now 😛 I think that ferocity benefits casters more than melee classes; e.g. on a ToS, the range of your storm field increases and you can hit 7 instead of 5 enemies with it, and since it’s your main damage-dealing spell this is quite a substantial improvement.
The regular Kuthchemes weapons you buy for relics from the vendor are bind-on-pickup, but there is also another set of gilded Kuthchemes weapons, which are bind-on-equip. These drop from Onslaught Treasure Chests, which you can buy in the item shop. I bought five of them and got no weapons, which I guess shouldn’t be surprising as the drop rate is probably a good deal lower than that.
The gilded weapons have exactly the same names (except for the “Gilded” prefix) and stats as the corresponding regular weapons, and they also use the same models, but they tend to be coloured in reddish tones rather than bluish ones. I was quite content with the regular ones, and e.g. the bluish shield looks very well on my guardian, with her blue dress, blue hair and blue horse 🙂 But I know at least one player who took the trouble to get a Gilded shield for his ToS because it went better with the red robe he wears as vanity armor.
The tank shield (Kuthcheman Tower Shield) has particularly nice stats, having much more armor than any other shield I know of (1858 armor, plus 120 armor from strength); not to mention that it has a Kutcheman gem slot, where you can put a legendary gem with 750 armor (and 75 protection). This brings you to a total of 2728 armor. By contrast, the T6 tank shield has 968 armor plus 164 armor from strength, for a total of 1132 armor.

Kuthcheman War Blade

Kuthcheman Tower Shield
Kuthcheman pets
The new vendor also sells three purple pets, costing 650 relics each: the Kushite Chieftain, Prince Kutamun and the Khorajan Sandwyrm. The pets look nice, but a minor disappointment is that they don’t do anything interesting; they just stand there. The Khorajan Sandwyrm is a large snake; the Kushite Chieftain is a smallish rhino with an even smaller rider; and Prince Kutamun is tiny, riding the horse the size of a dog.

Kushite Chieftain

Prince Kuthamun

Khorajan Sandwyrm
I was pleasantly surprised to see that Funcom also added fights for these pets to the Pit Master’s Arena in the Field of the Dead, as they often tend to forget this when adding new pets to the game.
Now, the amount of HP that a pet has when you fight it in that arena normally depends on its rarity: white pets have about 14k HP, green ones have 25k, blue ones 44k, purple ones 59k and orange ones 81k. But surprisingly, two of the new pets, the Kushite Chieftain and Prince Kuthamun, have 119k HP, twice the amount you’d expect for a purple pet.
The Kushite Chieftain fight was easy enough anyway. He has an ability called Star Fall, at the end of which cast he spawns a few circles on the ground and it probably makes sense to stay out of them to avoid taking damage. There is a ranged holy attack called Judgment, which you can CC. Apart from that it was just a tank and spank fight.
The Prince Kuthamun fight, however, was very difficult for me on my guardian. He hits relatively hard; if I try to just tank and spank him, I will either die from the incoming damage (if I do it in frenzy) or run out of time (if I do it in normal or defensive stance). The only way I could do it was by going frenzy (and also equipping heavy armor, DPS-oriented accessories, using a DPS-oriented build, the Prime Initiative perk for an extra CC, etc.) and taking care to avoid some of the incoming damage by CCing and kiting. He has two important abilities:
• I Shall Not Be Beaten gives him a damage buff for about 10 seconds. You can CC him while he’s casting this to prevent him from getting the buff. He doesn’t turn while casting it, so you also use the opportunity to go around him and land a combo on an unshielded side meanwhile. A good finisher on his back has a chance of knocking him off his horse, not that this seems to change the rest of the fight in any substantial way.
• Aura of the Dreadnought gives him two buffs. One lasts a shorter time and makes him completely immune to damage, but also snares him, so you should kite him during that time to avoid taking damage unnecessarily. The other buff lasts a bit longer and simply increases his mitigation. He can’t be interrupted while casting Aura.
I found the Momentum stun useful, both as a chance of interrupting his casts and also to reduce the overall damage he does, because he hits pretty hard if you’re in frenzy stance. Even so, I just barely survived and just barely killed him within the 3-minute time limit. Here’s a video of the fight:
I wonder what it’s like on other characters, but I haven’t farmed the arena on any of my alts so none of them is at the point where they could fight a purple pet at all.
The third pet, Khorajan Sandwyrm, has the normal amount of HP and there’s nothing unusual or particularly challenging about fighting it in the arena; it’s a simple tank and spank fight.
Some general advice on doing Kuthchemes Onslaught
In the first month or so after Kuthchemes was released, it seemed to be pretty popular, lots of people were doing it both in private groups and via the raid finder, and the latter was popping even at higher waves. But after that, I was saddened to see how quickly most people lost interest in it, usually after getting enough relics to buy the weapons they needed. They seemed to have little interest in continuing to farm for gems, let alone for social gear. In the raid finder, there were so few competent players left signing up that doing anything higher than waves 1–5 became too risky, as most of the time the group would wipe without getting anything done. Most people, if they kept on doing Kuthchemes at all, did waves 1–5 for the daily quest and were content to accumulate relics gradually in this way.
So I thought I’d post some advice here based on my experience with farming slightly higher waves, though I doubt it will be of much use; those who are interested in farming higher waves already know these things, and those who aren’t will have no use for them.
• At lower waves, people usually run around as a group from one wildlife camp to another to clear them for some additional relics, and they fight the incoming waves of mobs wherever they happen to encounter them. At higher waves, say from 15 onwards, this gets more and more risky; if you encounter a large wave of mobs in the open, you can’t bunch them up easily (especially if many of them are ranged, as often happens), so you can’t kill them quickly and the tanks also can’t keep them aggroed if they are scattered all over the place, so they’ll start killing the squishies.
Instead, at that point it’s common for the group to stay close to the temple entrance nearly all the time, waiting for the mobs to come to you. They go for soldiers in defensive stance by default, so the tank can use line-of-sight to control where they go and to bunch them up more easily. Various corners of the temple are useful for that, and the top of the two stairways leading to the temple from the sides is particularly useful. If the mobs are coming from above (from the sides of the temple), stand on the stairs a little below the top, so that they can’t hit you at range and have to run to the top of the stairs. If, on the other hand, the mobs are coming from below, stay on the level floor between the stairway and the temple wall, so that the mobs have to come all the way to the top of the stairs before they can hit you. This way you can keep them bunched up relatively easily, and you can DPS them more efficiently.
• From say wave 15 onwards, and even more so from 20 onwards, I’ve found it very useful to have someone on discord calling when to go where, to keep the group together. Letting people run around individually is a surefire way to get them killed, which usually leads to a downward spiral and a wipe.
When you get the on-screen message about the boss casting a noxious spell, this is the sign that green clouds of poisonous gas will soon spawn on the location where randomly chosen players are standing. It’s useful if people run away from the tops of the stairways at that point (e.g. go towards the middle, in front of the temple gate itself) , so that the clouds won’t spawn there and you can go back there after the clouds stopped spawning. There are three clouds normally, but from wave 28 or so there seem to be four — count them so you know when it’s safe to return to your normal positions.
• If you see a skull miniboss running towards the temple entrance, you should have someone charge it; that makes the miniboss stop there instead of continuing his or her way inside the temple. Fighting it inside the temple is risky because its gets very crowded and the waves of trashmobs might block your way out. Some other CCs might also work instead of charging, but not all of them; sometimes I’ve seen the miniboss continue its way after the CC wore off.
• There are two useful kiting spots on the north-west and north-east corners of the temple wall. You can easily jump, almost walk, from the platform on the inside of the wall to the rocks on the outside and back; but the mobs can’t jump there and will instead have to take a detour. This can be extremely useful, e.g. to kite a boss while the rest of the group deals with any remaining skulls and trashmobs, etc.

You can jump as shown by the red arrow, but the mobs will have to run around as shown by the green arrow.
• Since the update that added Skull Gate Pass to the game, you can use self-rez potions not only there but in Kuthchemes as well, which is highly advisable. I recommend the ones you buy with Rare Trophies, from the Trader of Fortunes vendors in Fengdu (Kara Korum) or Heaven’s Lake (Paikang); these have no cooldown, so you can eat them like candy from a stranger’s van 😛
Similarly, you can spawn pets there, and many people like to use e.g. the Rocknose pet, which has a chance of interrupting the enemy’s casts; or a Kappa pet, which can give you various buffs.
• Some thoughts on the group setup for higher waves. The main thing is to have enough AoE damage to deal with the waves of trash. A good demo is pretty much indispensable due to their Wave of Flames spell. It isn’t necessary to have more than one tank, but it’s very advisable to have two healers so that in case one dies, the other one can still rez people (Acheronian Deathcharms, which you can buy from one of the vendors in your guild city tradepost, can also be useful here, as they enable non-healers to also rez people in case of emergency). Having both a PoM and a pet necro is a very useful combination because you can use Holy Cleansing to quickly clear a wave when you start getting overwhelmed. Of the soldiers, a conqueror is attractive due to the nearly constant knockbacks, which make it much easier for squishies to stay alive; on the other hand, it is impossible to fatality a mob while it’s knocked back, so the meter will fill up more slowly.
The two groups that reached wave 40 so far had the following setups: one had a conq, 2 PoMs, 2 demos and a necro; the other had a DT, PoM, ToS, HoX, demo, necro.
Spawning the champion; fatalities
At higher waves, people generally don’t care much about farming the wildlife camps, because the amount of relics you get from them remains constant (2 relics per camp, or 3 if with the subscriber bonus), but the HP of the mobs there keeps growing and so does the time to farm them. Your main interest at higher waves is in spawning the champion (i.e. the end-of-wave boss), because it is he that drops the gems and social armor pieces, as well as an increasingly large amount of relics: at waves 1–9, the champion drops 5 relics (8 with the subscriber bonus); at waves 10–14, it drops 10 (15 with the s.b.); at waves 15–19, it drops 15 (23 with the s.b.); at 20–24, it drops 20 (30 with the s.b.); and from 25 onwards, it drops 25 (38 with the subscriber bonus). The highest wave at which I killed the champion was 38 and it still dropped 25 (38 with the s.b.) relics there.
The champion spawns if you fill the meter before killing all the mobs of that wave (wildlife camp mobs don’t count as mobs of the wave for this purpose); the meter fills from doing fatalities and, if I’m not mistaken, also from doing kill streaks. Towards the end of the wave, if the meter isn’t full yet, it’s useful to keep some mob alive and kite it — the guardian skull-bosses are very suitable for that, since they are very slow (until you DPS them below 50% to lose their shield) and thus easy to kite. While shielded, the guardian has a very high chance of resisting spells, so you can have a necro put some melee pets on it to get its attention; and keep it away from where you’re fighting so it doesn’t lose its shield (and start running annoyingly quickly) from splash damage.
Then, when you’re done fighting the wave except for that one mob you’re keeping alive and kiting, you can try to fill the meter by doing fatalities on the mobs from the wildlife camps. Since you have a limited number of mobs there and have to do enough fatalities to fill the meter, it is in your interest to avoid killing those mobs without fatalities. Thus, you can’t use magical attacks on them, because there the mob will take damage from the attack regardless of whether it triggers a fatality or not. Instead, you have to use finishers of melee combos.
Once the mob is at sufficiently low health (low enough that the combo finisher has a decent chance of killing it), the melee character should deliberately miss the white hits of the combo and then land the finisher, but interrupt it by moving or jumping as soon as the finisher starts. Now, when the finisher starts, the server calculates its damage; if this would be sufficient to kill the mob, the server then does a random roll to decide if it will trigger a fatality; and if it does trigger a fatality, your melee character gets locked into the fatality animation and cannot interrupt the finisher.*
[*This isn’t quite true. Sometimes it happens that the fatality animation starts, but gets interrupted anyway; I suspect this has something to do with lag and with the server and client briefly having different ideas as to what happened. In any case, if this happens the mob still won’t have taken any damage, so there’s no harm and you can keep trying.]
On the other hand, if the server decided there will be no fatality this time, it lets you interrupt the finisher, and if you have interrupted it before any of the hits that constitute the finisher actually happened, the mob will have taken no damage and the combo won’t even go on cooldown. A popular combo for these purposes is good old Slam, which doesn’t require any white hits before the finisher and where the finisher consists of a single hit that comes at the end of the animation, so you have enough time to cancel it.
To make sure that you have enough mobs left at the end of the wave in case you need to do fatalities, it makes sense to avoid killing any mobs from the wildlife camps during the wave itself; and thus to be careful not to pull them while e.g. fighting some skull miniboss that might have positioned himself nearby. Another popular technique is to leave the treasure chest mob alive after clearing a wildlife camp. This mob doesn’t despawn, but remains alive indefinitely, so you can keep it around in case you need something more to fatality at some later point. The only risk here is that if you wipe, you won’t get the chance to kill any remaining treasure chest mobs and loot the 2 or 3 relics that each of them drops upon being killed.
The special enemies
This is what Funcom’s forum thread calls them; I like to think of them as skull minibosses because they are marked with a skull on the map. The thread gives a good overview of their abilities.
Of the four types of special enemies, the witches should probably have the highest priority to be killed, because their debuffs can drain your mana and stamina, snare you, reduce the AoE of your spells and reduce the power of incoming heals — a sure way of making the whole group completely ineffective. The witch can also be CCed with everything except fear.
The concubines spawn clouds, which are annoying but as long as you stay out of them (to avoid the damage and stun at the end just before the cloud disappears) they are not too bad. The cloud gets thicker over time, which gives you a hint when it’s really time to get out. The spell whereby she spawns clouds is called Roiling Storm and the damage (and stun) come at the end of the spell. If you kill her during the spell, the cloud will stay but won’t do damage or stun you at the end.
The concubine also causes each player to do some electrical damage to other nearby players (Echoing Lightning), which can be painful at higher waves. Try not to stay too close together. Unlike the witch, the concubine can’t be CCed.
The excavator spawns groups of trashmobs which aren’t particularly dangerous at first, but they explode upon being killed, which can get quite painful at higher levels. Besides, the longer the excavator remains alive, the more trashmobs he spawns each time he completes his spell. You can keep an excavator alive some time to help fill the meter (thanks to the extra trashmobs you’ll get from him), but be careful to not get overwhelmed.
The excavator can be CC’ed to interrupt his summoning spell and force him to start from scratch. Even a guardian using his momentum stun and his other CCs can completely prevent the excavator from spawning any trashmobs for as long as he likes.
Guardian skull-minibosses are the least trouble. Initially the guardian has a shield that gives him a high immunity but also snares him, so he’s easy to kite. His immunity also means he has a high chance of resisting things like irritate and goad, so be careful if he runs in the middle of your group hitting the casters — the tanks can’t grab him as easily as they could if it weren’t for the shield.
Once you DPS him below 50%, he loses his shield (and doesn’t regain it later even if you let him heal up), at which point he’s hard to kite but also easy to kill and to tank.
Guardians come in two varieties: one has a sword and shield, one has a two-handed weapon. The latter, if he can’t reach the player who has aggro on him, will switch to a crossbow and use ranged attacks; the former, however, will just stand still and helplessly try to switch his weapons without actually doing anything. This makes the sword-and-shield guardian easier to deal with; a caster can grab aggro and then stand on one of the little raised square platforms (merlons?) on the outer side of the temple walls. The guardian won’t be able to reach him with melee attacks there and, being too incompetetent to do a ranged attack, will just stand there and do nothing.

A sword-and-shield guardian unable to reach my necro while she stands on the platform. (Click to enlarge.)
All types of special enemies frequently get pretty strong heals, which you can’t prevent them from getting, but a rogue can remove them with Taintead Weapons. This is probably the only reason why you might want to have a rogue in the group, as otherwise their poor AoE damage makes them distinctly less preferable to casters. Somewhere until wave 20 or so, you can have a single rogue running around on his own killing the special enemies while the rest of the group stays by the temple entrance, killing the waves of mobs that come there.
This plan gradually gets more and more risky because the rogue is also at risk of dying. If several special enemies spawn together, the damage from them might kill him; if one of the special enemies is an excavator, the trashmobs he summons might kill the rogue; and if any Mana Hungerers (hyena-like mobs) spawn there, they might go for the rogue because no mana user is nearby (normally they lock their aggro on a mana user, but will take a non-mana user if there are no mana users near enough), and kill him.
Thus at really high waves the rogue is probably more of a liability than an asset. The leaderboards currently show that no barbarian has reached a wave above 30, no assassin over 27 and no ranger over 25. At that point you probably want to avoid having a rogue in your group, and you can send two casters, or even the whole group, to kill special enemies. Just make sure to clear any current waves of trashmobs before leaving the temple entrance and moving to where the skull miniboss stands.
The champions
“Champions” is what Funcom’s forum thread calls the end-of-wave bosses that spawn if you filled the meter. In each wave, the mobs spawn for 200 seconds; after that, no new mobs will spawn (except if you have excavators alive; they will of course keep spawning trashmbos). If the meter fills during those first 200 seconds, the boss will spawn immediately when the 200 seconds are over; if the meter fills later (but before you have killed all the remaining mobs and thus finished the wave), the boss will spawn immediately when the meter fills. The boss, like other mobs, will generally go for a soldier in defensive stance, but if no such character is nearby, the boss will go for whoever is closest. Use this information to avoid getting surprised by a boss. Running a script that shows the time in group chat is helpful here.
People who mostly do lower waves are perhaps not used to paying much attention to the mechanics of the boss fights, so here’s some advice that might be useful at higher waves:
Kushite Chieftain
This is the rhino boss that you encounter at waves 1–4 and again at 20–24. The most important ability to watch out for is Earthquake, at which point he knockbacks the aggro holder and charges the most distant player or pet. He also seems to get a temporary amount of hate towards the charged target, so that he’ll do one or two hits on it and quite possibly kill it. Keeping some ranged pet at a suitable place to attract the charges can be useful, though in my experience it isn’t 100% reliable that he will in fact charge a ranged pet rather than a player (even if the pet is farther away).
The tank can help a lot with controlling the charge and the knockback by running away while the boss is casting Earthquake. If other players are close enough, you can be the farthest by the time the cast is finished, so that the boss will charge you instead of the squishies. You can use doubletap at that point to avoid getting knockbacked.
Other players should help by making sure they hug the boss while he’s doing Earthquake. If you’re kiting e.g. a Guardian skull miniboss, run to the boss anyway and then run away again so the Guardian doesn’t get caught in the splash damage and cause trouble.
The Earthquake ability has a fairly short cast time, so you have to be ready and react quickly. It seems to be on a timer, and usually comes immediately after his Savage Healing cast, except the first one, where there are usually one or two melee attacks between Savage Healing and Earthquake. However, if you kite the boss, the timers of these different abilities can get confused and you shouldn’t rely on them coming in this sequence.
This boss has a pretty strong self-heal, so if you have a rogue in the group, he can remove the heals and the fight will be much shorter. This also means that you can’t afford to kite the boss much during the fight or he’ll heal up. He hits pretty hard, and it’s all physical damage.
Presumably this boss would appear again at wave 40, but I don’t think anyone has actually seen it. My understanding is that the two groups that cleared wave 40 didn’t get the boss there and then wiped on wave 41 before reaching the boss.
Attendant of Zug
This is a giant shrimp similar to e.g. Leviathus in the Black Ring Citadel; you encounter it on waves 5–9 and again at 25–29. This boss does magical damage and also hits pretty hard, but as long as the tank wears protection gear, it’s a simple tank and spank fight. It is also slow and thus very easy to kite, should you want to do so. From time to time it spawns two adds (Creeping Cold) that do relatively heavy physical damage, but they have very low HP so they should be easy to kill quickly (or indeed should die from splash damage).
In fact, when it comes to waves 25–29, the difficult part is not the boss but the trashmobs during the wave, because you get large numbers of ranged mobs (mostly horse archers, but also some casters) and it can be difficult to bunch them up well enough and kill them before they start killing the squishies in your group.
Prince Kutamun
This is a warrior on a horse that you encounter in waves 10–14 and 30–34. Every few seconds he drops pools of fire on the ground, which gradually grow larger and eventually disappear. Anyone standing in the fire takes damage, of course. Thus the tank should move the boss every couple of combos to avoid standing in the fire. Besides this fire damage, the boss does physical damage (slashing and sometimes piercing) on the aggro holder, and occasionally there’s also an unholy proc (Unholy Touch).
I have very limited experience with this boss in its higher-level incarnation, but it seems that he has been considerably overtuned there and basically hits so hard that trying to tank it is next to impossible in the long run. In one group I was in, a DT tanked it for a short time while being healed by a PoM and a ToS, the other three members being mages (demo, necro and HoX), and the group had a very high damage output so the fight didn’t last long. That, I guess, is one way to do it.
The other way is by kiting, which is what we used when I was dealing with this boss on my guardian. Unlike the rhino boss, Kutamun doesn’t heal up. You can have the tank build some aggro by doing irritate and maybe a combo, then use the kiting spots by the northern corners of the temple while other people stay on one of the square platforms on the wall and slowly DPS the boss from range. The tank can try to hit the boss a bit now and then, to keep aggro more easily, as long as he doesn’t get himself killed by the insane amounts of incoming damage.
Sooner or later, someone will pull aggro anyway and most probably die. The tank, at that point, should take the boss to the opposite corner of the temple and kite him on the kiting spot there, while one of the healers resurrects the dead player(s). You might want to keep one healer at a safe distance and completely uninvolved in the fight (apart from the rezzing) so that you never get into a position where both of your healers would be dead. It’s a slow, but steady and reasonably safe way to do it.
Thugra Khotan
This is the magician boss that you encounter on waves 15–19 and again at 35–39. I’ve only done waves 35–39 once, and I was on my necro then, so I can’t say much about the high-wave version of the fight except that the way we fought him didn’t seem different in any substantial way from the low-wave version.
The boss has two main abilities to watch out for. During Ignite the Earth, he targets a random player and at the end of the casts he spawns a circle on the ground where that player stood; this circle does fire damage to anyone standing in side it. Thus, the targeted player should run away from the others during the cast, so as not to spawn the circle at an inconvenient location. Fighting near one of the corners of the temple can be useful for this purpose, as the targeted player can then simply break line-of-sight by going around the corner. If a circle nevertheless spawns on the boss, the tank will simply have to move him.
The other ability is Sever Souls, which spawns floating skulls at the locations where players and their pets stood. A few seconds later, these skulls explode, doing a lot of AoE damage and stunning players. You should prevent this by killing the skulls before this happens. Some of the skulls may be at range (e.g. due to the presence of ranged pets), so make sure to look around so as not to miss any.
During the fight, the boss also spawns adds — trashmobs of the same kind that you also see during the wave. They run for the tank, as usual, and the melee ones will easily die in the splash damage. The ranged ones, however, may be content to stay at range and hit the tank from there. Thus other players should take the trouble to aggro these and kill them, so that the tank doesn’t have to put up with damage from these adds in addition to what he gets from the boss.
Social armor
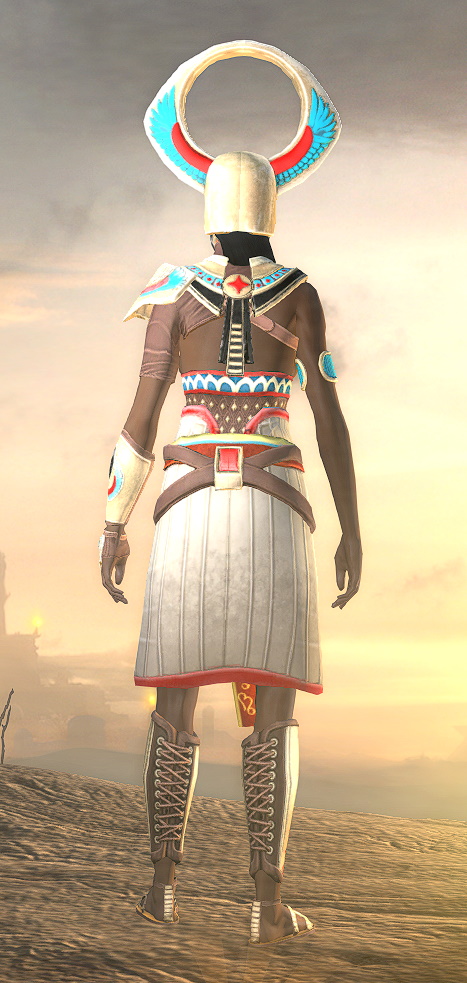
Besides gems, the main allure for me of farming Kuthchemes Onslaught was the social armor set, Kuthchemes Sorcerer-King, which drops from champions (end-of-wave bosses) at waves 20 and above. It consists of 9 pieces (all 8 usual armor pieces plus a necklace):

Stygian priestesses gone wild!
Collecting this set probably took more farming than any set I’ve collected in Age of Conan so far. Like other drops in Onslaught mode, this armor is bind-on-equip, so it can be traded between players. If this game still had a healthy population of players able and willing to farm higher onslaught waves, we might see a decently liquid market emerge and completing a set might not be so difficult; but as it is, the main problem is simply that very few of these items come into existence because so few people farm those waves. Many thanks to my fellow farmers, especially those who traded items with me to help me complete my set. It would not have been possible without you ❤
I was wondering which character to equip the set on. It looks like something much more suitable for a caster and a Stygian; my main is a guardian and a Cimmerian, so this set wouldn’t look good on her; besides, I didn’t want to give up my blue Aquilonian dress there. So I decided that I would equip the Kuthchemes Sorcerer-King set on my ToS once I collected all the pieces. Now that I’ve done so, I can’t help feeling that the set doesn’t look quite as good on my ToS as I hoped it would when I started collecting it all those many months ago.
The headpiece covers my character’s face, which I always dislike in headpieces; besides, its face-mask looks like a man’s face complete with a pharaonic beard, and I don’t think it looks terribly good on a female character. But on the other hand, to hide the headpiece means to be deprived of the beautiful basketball hoop at the top, which is surely one of the most striking features of the whole set.
The chestpiece is perhaps the skimpiest, sluttiest chestpiece I’ve yet seen in this game, leaving *both* of your tits completely exposed. The fabric you see below the tits is actually a part of the leg piece! The “chest”-piece mostly covers your left shoulder and a bit of the upper arm. Its colour happens to almost perfectly match my ToS’s skin (IIRC that’s the darkest shade of Stygian skin colour), which makes the chestpiece barely visible. It might look better on a lighter-skinned Stygian; perhaps I should have equipped it on my necromancer, but then I didn’t want to abandon her innocent-looking white robes 🙂
Apart from that, the set is really quite nice-looking. I particularly like the contrast between red and turquoise areas. I was a bit surprised that the wrists and hands are so asymmetric, being present only on your left hand, but maybe the idea is that you carry a shield in your right one. But if that was the plan, unfortunately my ToS mostly uses a staff.
Drop rate of the social armor
Doing 1091 waves at wave 20 or higher, I saw pieces of social armor drop 40 times (4 legs, 4 necklaces, 4 hands, 3 belts, 3 chests, 6 shoulders, 7 bracers, 7 heads, 2 feet); thus the chance of a piece of social armor dropping seem to be about 3.66%, or about 1 in 27. [You might say that it doesn’t make any sense to estimate the drop rate this way; the denominator should be the number of champion kills, not the number of waves done, because if you do the wave without spawning (and killing) the champion, you certainly won’t get any social armor. Unfortunately I wasn’t keeping track of my champion kills; but since we farmed waves 21+ specifically for the sake of gems and social armor, i.e. things that drop from the champions, rather than just for the sake of relics, we generally took care to spawn the champion whenever possible, except if e.g. there weren’t enough mobs in the camps to fill the meter by doing fatalities. But this is so rare that my estimate of the drop rate should still be pretty close.]
Of course it is possible that the drop rate actually depends on the wave, being higher at higher waves, in which case my estimate is some mixture of the true drop rates. But since I did the vast majority of my wave 20+ farming on waves 21–25, it should be a pretty decent estimate of the drop rate on those waves. The following table shows the drops on a per-wave basis:
| Wave | Number of times I did this wave | Number of social armor drops I saw at this wave | Drop rate |
|---|---|---|---|
| 20 | 148 | 3 | 2.0% |
| 21 | 280 | 10 | 3.6% |
| 22 | 213 | 6 | 2.8% |
| 23 | 166 | 5 | 3.0% |
| 24 | 131 | 6 | 4.6% |
| 25 | 75 | 5 | 6.7% |
| 26 | 25 | 1 | 4.0% |
| 27 | 17 | 1 | 5.9% |
| 28 | 8 | 1 | 12.5% |
| 29 | 13 | 2 | 15.4% |
| 30–40 | 15 | 0 | 0.0% |
| Total | 1091 | 40 | 3.7% |
If you squint a little, it does look a bit as if the drop rate increased with the wave number; but I don’t think I have enough data to be able to tell whether that’s really true or just due to random chance.
End-of-wave rewards
Here are some statistics about the drops you get when looting the piles of treasure after the wave is over. The following chart shows how often I got which type of reward, depending on the wave (only waves 1–30 are shown; I did waves 31–40 only once, so it would make little sense to include them in the chart):

We can see that I was mostly farming waves 21–25, 15–19, and 1–5 (I did a little more than 800 waves in each of these three ranges). The following chart shows how often each type of reward appeared as a percentage of all the successful completions of that wave. Percentages for waves 6–14 and 26+ are probably a bit unreliable since I did those waves relatively few times.

The chance of getting money seems to be 2/3 (2073 money drops in 3117 waves = 66.5%), and seems to be the same regardless of level. The remaining 1/3 of the time you get AA xp or one of two kinds of simple relics, and these three possibilities seem to be about equally likely. An exception to this is that in waves 1—5 there is only one type of simple relics (Simple Relics I) and they seem to be a bit less likely to drop than AA xp (17% vs. 14%).
If you get AA xp, the amount depends on the wave: 15k on waves 1–10, 20k on waves 11–20 and 25k on waves 21+. [You might expect that you’d start getting 30k from wave 31 onwards, but the only AA xp drop I saw in my very limited experience on waves 31–40 was 25k AA xp on wave 34.]
What kind of simple relics you get also depends on the wave: Simple Relics I drop on waves 1–10; Simple Relics II drop on waves 6–20; Simple Relics III drop on waves 11+ and Simple Relics IV drop on waves 21+. Thus at every wave except 1–5, two different tiers of relics are possible. [Again you might expect something to change after wave 30, but in my limited experience it doesn’t. The only simple relics I saw drop on waves 31–40 were Simple Relics III on wave 35 and Simple Relics IV on wave 40.]
We saw that most of the time you get money as a reward; but how much do you get? I looked at the individual drops for a few waves (1, 15, 19, 21, i.e. the ones I did the most often) and the amount you get clearly seems to be distributed uniformly on some range [a, b]; but the minimum a and maximum b of this distribution depend on the wave.
We can use the same techniques as in my post about money drops from mobs all those many years ago: let W be the sample minimum, Y the sample maximum and n the sample size; then we can estimate the population minimum a using A = W − (Y − W) / (n − 1), the population maximum b using B = Y + (Y − W) / (n − 1), and the population mean (a + b) / 2 using M = (W + Y) / 2. The following chart shows all these quantities as a function of the wave number:

Keeping in mind that our samples for waves 6–14 and 26+ are small and the results there are unreliable, there seems little doubt that the minimum drop a is 20 silver on waves 1–20 and that it jumps to 40 silver on waves 21–25; as for what happens from wave 26+, I don’t think we have enough data to say anything reliable.
The range b − a seems to grow linearly with the wave number; if we denote the wave number by k, we have b − a = 10 k, so that the maximum drop b is 20 + 10 k silver on waves 1–20 and 40 + 10 k silver on waves 21–25.
[P.S. While making the above charts, I encountered one of the most ridiculous bugs I’ve ever heard of. Excel 2013, running on Windows 10, crashes when you try to edit the properties of a chart axis if your regional settings in Windows are set to anything else than “English (U.S.)”… Good job, Micro$oft, this is the sort of bug that would make even Funcom developers proud!]
Mob HP
As always, estimating the HP of mobs from the combat log is a bit unreliable, especially if they heal themselves, as many of these mobs do. Besides, I have relatively few logs from the lowest and the highest waves, so the data is a bit scarce there and the estimates are even less reliable. Nevertheless, a fairly clear picture emerges:

The amount of hitpoints that mobs have in Kuthchemes grows exponentially as a function of the wave number. Interestingly, this exponent is not the same for all the mobs. The HP of champions (end-of-wave bosses) grows by about 4.8% per wave, while the HP of mini bosses grows by only about 2.8% per wave. Thus, while in the first few waves, a champion has about four times as much HP as a mini boss, by wave 35 a champion has more than seven times as much HP as a mini boss.
By “mini boss”, we mean here those that appear as a part of the trash waves (Kushite Firedancer, Myrcinus, Otanes, Shathrazan, Templar of Set, Asshuri Sultan) as well as two of the skull minibosses, namely Ancient Kuthcheman Guardians and Heralds of Khotan. The remaining three types of skull minibosses (Ancient Kuthcheman Witch, Concubine of Khotan, Excavator of Souls) are squishier: they have about 20% less HP than other mini bosses.
More T6 armor sets
Some time ago I posted some screenshots of the Steel Behemoth set, one of the T6 full-plate armor sets. Well, after many months of further lootwhoring, I am now in a position to post a few more sets 🙂
Warded Brute
This is the full-plate protection set. It looks just like Steel Behemoth, except that it’s blue instead of orange. I think I like this color scheme better than the orange one:


Compared with the Steel Behemoth set in terms of stats, the Warded Brute set gives you 1355 protection at the expense of 1488 HP and some smallish amounts of DPS, armor, hit rating and hate increase rating.
Steel Behemoth
For the sake of completeness, I’ll repost the Steel Behemoth full-plate set from my previous post:


Great Impi
There are two heavy sets in T6, both fairly DPS-oriented; Masquer of the Sands is for DTs (it includes magic damage (unholy)), while Great Impi is suitable for conquerors and guardians. Compared to the two plate sets, this one has more DPS, critical rating, lots of hit rating, and even a little protection (400 to be precise); at the same time, of course, it has less armor and HP.


The mighty DPS gaurd!
The DT set (Masquer of the Sand) looks the same, just recolored (reddish instead of green).
I think that except for the headpiece, which is completely ridiculous, the rest of this set actually looks pretty good. It reminds me a little of these guys:

(Source: Wikimedia)
Primal Spirit
This is another DT set the PoM/ToS T6 set. In terms of stats, it’s a very nice set. It gives you a total of 777.4 magic damage and 2288 heal rating (see also my old post with the comparison of priest armor sets). This means that compared with the T5 PoM/ToS sets, you gain about 850 HP and 900 heal rating, as well as a little magic damage, hit rating, and 400 protection (not counting what you get indirectly from wisdom). In other words, the T6 set has almost as much heal rating as the T4 Thousand Blossoms set (which remains the set with the largest amount of heal rating), while having more DPS than any other priest set.
The main downside is that it looks fairly ridiculous. There’s the inevitable skull on the left shoulder, some elephant tusks on the helmet, some sort of miniature palm tree on the top of your head that will be all the rage at your next cannibals’ meetup, etc. :}


Coming Soon™ some day, hopefully: Cackling Marionette, the demo/necro set (a.k.a. how many dead babies can you fit onto a set of armor before your own pets start laughing at you?).
The Slithering Chaos
The Slithering Chaos is a six-player dungeon introduced in update 5.1. The entrance is located in the Dragon’s Spine at (1273, 316), in the southern excavation site.
The trash mobs can be CC’ed, but do not fear them as they can get bugged and you then have to exit the dungeon for 10 minutes to reset them. One ability that is particularly worth interrupting is Tempest, which is a frontal cone knockback. There is also Revitalize, a very powerful and annoying heal on the mobs (if you didn’t manage to interrupt it, a rogue can still remove it with Tainted Weapons).
There are three boss fights, all featuring the same boss (Avatar of Yig) that looks like an enormous dust mite.
Quests
The Void Behind the Veil: from Alanza, it requires the Shard of Madness as a prequest (that is a Sepulcher of the Wyrm quest from Ankh-Ausar; it becomes available after you’ve done the early part of the Crawling Chaos quest chain, up to the Serpent Beneath the Skin quest). Rewards: 2 expertise points, 24 MoA.
The Origin of Species: from Alanza; it becomes available if you have completed The Void Behind the Veil and also The Metamorphic Madman (the latter is a solo quest that begins with killing the Scorpion mob near (980, 527); note that sometimes the instance of the playfield gets bugged and the scorpion stops respawning; in that case try switching to a different instance). This is a solo quest that is mostly of interest because it leads to the next one.
The Descent of Serpent Men: from Yaqub-Har; this is a followup to the Origin of Species. This quest requires you to kill three bosses in the Coils of Ubah Kan, then all three bosses in the Slithering Chaos, and finally you have to get a Shard of the Trapezohedron, where the intention was probably that you’d have to also clear the Sepulcher of the Wyrm to get this; but the Slithering Chaos is really just a copy of the Sepulcher, and the developers presumably forgot to remove the Shard of the Trapezohedron from it, so that you can also pick it up from the Slithering Chaos. In both dungeons is on the little mound in the centre of the final boss room.
The quest reward for the Descent of Serpent Men is one of the rings that also drop from the final boss in the Shard of the Trapezohedron. You can choose among two or three different rings depending on your archetype.
The first fight
The boss normally does physical damage on the aggro holder. However, if the aggro holder isn’t standing in front of the boss and within melee range of it, the boss will instead hit him with Smite, which is a much harder-hitting magical ranged attack.
Occasionally, a gray circle spawns on the ground, centered on the player that is the farthest away from the boss. Anyone that stands in these circles will take damage, so you should have one player at range all the time to make sure the circles don’t spawn immediately in front of the boss.
Another important ability cast by the boss is Eradicate. At the end of this cast, there is a big AOE hit that comes from a glowing sphere in the center of the room. Thus, before the cast is finished, everyone should go behind the pillars to break line of sight to the center of the room (note: not line of sight to the boss!), and then go back to their usual positions after the Eradicate cast is finished.
The aggro behavior of the boss in this fight is a bit odd; it seems that he can only change aggro after eradicate, even if you use goad or forced engage.
The boss runs away at 25% of health and leaves behind a loot box which mostly drops blue chaos gems (which are tradable, unlike the purple and legendary gems which are bind-on-equip). There’s a small chance of getting a purple gem here as well.
(The loot box, just like in the other two fights in this dungeon, is a separately killable mob, so you can relog to a different character before killing it.)
The second fight
The boss still does mostly physical damage on the aggro holder and spawns gray circles on the farthest player, just like in the first fight. Occasionally he also cycles through three new attacks:
• Primacy is a frontal cone magical attack. The cone is fairly narrow, but the hit (which comes at the end of the cast) is very hard and will oneshot most people, so everyone should avoid it by moving to the side.
• Undertow: at the end of the cast, the floor of the room gets covered by electricity that will kill anyone that comes in contact with it. This electricity stays there for several seconds, until you see the electrical particles disappear. To avoid this damage, everyone must be on elevated ground — the various pillars, torch holders, and assorted other rubble that lies around the room. The very centermost part of the little mound in front of the boss is also safe, but has enough space for only two people; so ideally, the aggro holder should stay there (because if he moves away, the boss will hit him with Smite, same as in the first phase) with one of the healers.
• Spines of Set: is like Primacy, but it hits in a cone on the sides of the boss (perhaps also behind him?), so everyone should avoid it by moving to the front of the boss.
When the boss’s health drops below 50%, he gains another ability: Resplendent Beam. This is a channelled cast where the boss targets a player at random and a beam goes from the boss to that player. This player and everyone else standing in the way of the beam will constantly be taking damage from the beam (this is untyped damage, so it bypasses mitigation, bubbles etc.). To break the spell, the targeted player must quickly run into one of the gray circles on the ground. Thus it is useful to make sure that at least one circle is not too far from the boss (but also not too close to it so that the mound where the aggro holder stays during Undertow doesn’t get covered by a gray circle). It is also useful is players spread apart a little during this phase, so that they won’t all be taking damage when one of them gets the beam.
The boss runs away at 10% and leaves behind a loot box which drops purple chaos rings. There will also be a clickable item on the ground called a Broken Antenna. Clicking it gives you an item called Luminescent Antenna Fragments in your inventory, which you will need in the third fight.
The third fight
The boss alternates between two phases. In the first phase, he does physical attacks on the aggro holder (and hits him with Smite if he is not in front of the boss and within melee range), puts gray circles on the ground where the farthest player was, and does the Primacy frontal cone attack.
During this phase, the boss has a 95% damage deflection shield, so he takes almost no damage. He also has a buff called Curse of Yig, which slowly stacks up and if it reaches 10 stacks, everyone gets oneshotted.
Eventually the boss casts Rapture; a large red circle slowly emerges from the boss and at the end of the cast, there is a big AoE hit of holy damage. Thus, everyone has to run out of the red circle to survive.
After Rapture, you should send three players to the three large orb-like structures on the outer edge of the room, where each of them should stand at one orb and click his Luminescent Antenna Fragments (all approximately at the same time, somewhat like Yaremka’s balls in BRC Wing 1; wait for a red particle effect to appear on the globe before using your antenna). This will switch the boss into the second phase, remove his damage deflection shield (so you can and should DPS him during this phase), and reset his Curse of Yig buff (so that it won’t reach 10 stacks and oneshot everyone). The three players that used the antenna fragments also get a protection buff (Blessing of the Trapezohedron: +80% electrical and holy invulnerability) that makes them safe from the Horror of Yig attack (on which see below). However, they must be careful not to take aggro while they have this buff, or they will get killed instantly.
In the second phase, the boss does damage in the following ways:
• Horror of Yig: the boss keeps spamming this attack, which does electrical damage to everyone that is near the boss, unless they got a protective buff from using the antenna fragments (on which more below).
• Seethe: everyone is constantly taking holy damage from this unless they stand in one of the gray circles on the ground that have been left behind from the first phase.
• Baptism of Fire: a large fiery cone particle appears (without the boss casting anything) at the location of a player (seems to be always on the second one on the aggro list — it could even be a pet, dread shadow etc.). A few seconds later, the cone explodes and does a big hit of fire damage to anyone nearby, so players must move away from this cone to survive. (Note that the area of effect of this attack is a little bigger than the cone itself.)
• The boss still uses Smite on the aggro holder if the latter is not in front of the boss and in melee range. This should be avoided and in fact in this phase Smite hits harder than in the first phase..
During the second phase, the boss doesn’t have a damage shield, so this is when you should focus on doing DPS on him. Eventually the boss switches back into the first phase and the fight goes on like this until he’s dead.
A few notes to help people survive the various sources of damage in the second phase:
• The aggro holder needs to be able to stand in a gray circle so he doesn’t get damage from Seethe; but at the same time he must still be standing in front of the boss and within melee range so that he doesn’t get Smite. And at the same time, this circle must be positioned so that the aggro holder can stand out of it in the first phase and still not get hit by Smite (because in the first phase, standing in the gray circle causes you to take unholy damage). This means that one gray circle has to be carefully positioned in front of the boss, but a little to the side, so that the area where the aggro holder is safe from Smite is partly within the circle and partly outside of it. (Note: circles disappear after some time, so you should spawn a new one if needed; e.g. after each Rapture, everyone can run in and wait in front of the boss until the gray circle spawns there, and then the three people who have to click the antennas should run out to the globes and do it.)
When the boss switches back to the first phase, one of the people that don’t use the antennas on the globes can use his antenna to remove the gray circle in front of the boss so that it won’t get in the way of the aggro holder while he is tanking the boss. You’ll be able to spawn a new circle after the next Rapture anyway, as described above.
• Ranged DPS players should stay at range from the boss so that they don’t get hit by Horror of Yig. So they should be staying in one of the other gray circles that are farther away from the boss.
• Three players can be made safe from Horror of Yig by having them use their antenna fragments. This should be non-tanks that will need to be close to the boss, e.g. melee DPSers and healers.
• The area in which a gray circle on the ground protects you from Seethe is slightly larger than the circle itself. A PoM/ToS can, with a bit of care, stand just outside the circle in front of the boss and thus be far enough from the boss to avoid the Horrors AoE while still being close enough to the circle to also avoid the Seethe AoE; and also be able to heal the tank from there and do some damage (e.g. with Storm Field). This is useful if you have enough melee DPSers that need the protection buff more than a PoM/ToS does (because they really can’t be useful if they have to stay at range).
• Tanks should use a lot of protection, various protection-related group buffs from healers etc. are also very useful here. Some offtanking (at least with a dread shadow) is also useful, preferably in the shielded phase.
• If you use the antenna and then have aggro, the boss oneshots you (Damnation), so you can’t use the antenna to provide tanks with protection buffs directly.
The loot box from this fight drops legendary chaos gems as well as (purple) rings with a chaos gem slot.
Loot
For more about the gems that drop in the Slithering Chaos, see this excellent post by Fass in the AoC forum.
Rings
- Mark of Metamorphosis: 65 str, 373 heal rtg, 172 combat rtg, 51 hit rtg, 43 crit rtg, -183 pvp combat rtg, chaos gem
- Mark of the Serpent King: 79 wis, 60 magic dmg, 51 hit rtg, 43 crit rtg, -54 pvp magic dmg, chaos gem
- Might of the Serpent Men: 79 str, 258 combat rtg, 51 hit rtg, 43 crit rtg, -247 pvp combat rtg, chaos gem
- Ophidian Band: 79 dex, 258 combat rtg, 51 hti rtg, 43 crit rtg, -247 pvp combat rtg
- Ring of the Serpent Father: 65 wis, 373 heal rtg, 40 magic dmg, 51 hit rtg, 43 crit rtg, -39 pvp magic dmg, chaos gem
- Serpent’s Scale: 280 armor, 63 con, 51 hit rtg, 43 crit rtg, 156 protection, chaos gem
- Sigil of Yig’s Dominion: 79 int, 60 magic dmg, 51 hit rtg, 43 crit rtg, -54 pvp magic dmg, chaos gem
- Undulating Band of Yig: 32 str, 32 int, 50 magic dmg, 172 combat rtg, 51 hit rtg, 43 crit rtg, -134 pvp combat rtg, -35 pvp magic dmg
Gem stats (excluding any blessings)
The new chaos gems that drop in this dungeon consist of a base stat and zero or more T6 blessings (zero for blue gems, one for purple, two for legendary). Additionally, the base stat is 50% higher on the legendary gems than on the other two; the list below will show this in parentheses. What exactly the base stat is depends on the prefix in the name of the gem:
Precise: 27 (40) critical rating.
Warding: 267 (400) armor, 47 (70) protection.
Fierce: the stats on this gem depend on the class of the character with which you’re looking at the gem.
- Guardian, barbarian, assassin, conqueror, ranger: 150 (225) combat rating.
- PoM, ToS: 160 (240) heal rating, 20 (30) magic damage.
- HoX, dark templar: 20 (30) magic damage, 100 (150) combat rating.
- Necromancer, demonologist: 33 (50) magic damage.
- Bear shaman: 160 (240) heal rating, 100 (150) combat rating.
Blessings
The blessings on the gems are the same ones that also occur on T6 weapons and necklaces. Thus, by combining these with the new rings and gems, you can get three or even four stacks of a blessing. You need at least two stacks of a blessing for it to have an effect, but by combining the new rings (and gems) with T6 weapons and necklaces you can get three or even four stacks of a blessing.
- Ashur — Armor/Spell Penetration
- Black Pharaoh — Critical Damage Increase
- Crawling Mist — Hate Increase
- Emandua — Heal Rating
- Manic Haze — Offhand Rating + Tenacity
- Silence Falls — Hate Decrease
- Silver Twilight — Mana Tap
- Steel Behemoth —Critigation Chance
Unchained loot: updated drop statistics
Here is an updated version of my previous tables about loot that drops from the various kinds of caches that you get from unchained and excavator dungeons. As a bonus, I have now included a table for plain old Excavator’s Kits for the first time!
Excavator’s Kit (green)
The other caches in this post were introduced with the unchained dungeon system in Update 4.1.4, but Excavator’s Kits are older, having been introduced together with House of Crom in Update 3.2. They drop directly from bosses and even trashmobs in unchained and excavator dungeons, and judging by what we’ve seen on testlive, they will also drop in the new Slithering Chaos dungeon.
The table below is based on 1084 drops from 719 Excavator’s Kits (I got one drop 385 times; two drops 303 times; three drops 31 times). There doesn’t seem to have been any change in the number of drops per kit in Update 5.0.
| What | How many times it dropped |
|---|---|
| Green potions: | 235 |
| 3 Daggamalt | 83 |
| 3 Sweetpressed Haste | 76 |
| 3 Moonspill | 76 |
| Blue potions: | 71 |
| 2 Potent Daggamalt | 22 |
| 2 Dire Sweetpressed Haste | 24 |
| 2 Absolute Moonspill | 25 |
| Food: | 204 |
| Ta Neheh Leaf Elixir | 70 |
| Kingsmight Ale | 69 |
| Bloodpurple Ale | 65 |
| Other: | |
| Small money drop (48–88 copper) | 238 |
| Large money drop (3.9–15.5 silver) | 10 |
| an old-world level 80 blue BoE item (not from one of the level 70–80 sets) | 46 |
| an old-world level 80 purple BoE item (I got a Blade of Black Bile) | 1 |
| Manual of Discipline [10000 Mastery AA XP] | 214 |
| Flask of Completion [20000 Mastery AA XP] | 65 |
Each type of money drops seems to be roughly uniformly distributed in its range. For the small drops, the minimum I got was 0.4813 silver, the maximum was 0.8830 and the average was 0.6778. For the large drops, the minimum was 3.9099, the maximum was 15.5092 and the average was 9.7149.
Unopened Chest (green)
| What | How many times it dropped |
|---|---|
| 3 Daggamalt | 119 |
| 3 Sweetpressed Haste | 114 |
| 3 Moonspill | 106 |
| Manual of Instruction [2000 Mastery AA XP] | 126 |
| Manual of Discipline [10000 Mastery AA XP] | 69 |
| Flask of Completion [20000 Mastery AA XP] | 34 |
| 2 Ta Neheh Leaf Elixir | 21 |
| 2 Kingsmight Ale | 17 |
| 2 Bloodpurple Ale | 16 |
| money (1–5 silver) | 285 |
| an old-world level 80 blue BoE item (not from one of the level 70–80 sets) | 15 |
| an old-world level 80 purple BoE item (I got a Black Cragsfall) | 1 |
| Pet (9× Shredder, 7× Acheronian Raider, 5× Undead Guardian, 4× Emperor Scorpion) | 25 |
| Pharaoh’s Guard green armor (1× Armplates, 1× Boots, 2× Gloves, 1× Goldmail, 1× Helm, 3× Sleevelets) | 9 |
When we say that several of these things can drop, they can be the same thing twice, so you might get e.g. 6 Daggamalt from one chest. if the game decides to give you two money drops from the same cache, they will be shown separately in the money channel, rather than added up and shown as a single drop.
The table above shows 957 drops from opening 728 caches. It appears that the number of drops per cache has been increased in Update 5.0 (this also applies to Acheronian Caches and Mystical Acheronian Caches), at least for subscribers. Before 5.0, I got from 1 to 3 drops per cache (1 drop from 535 caches; 2 drops from 86 caches; 3 drops from 2 caches); since 5.0, I got from 2 to 4 drops per cache (2 drops from 76 caches; 3 drops from 24 caches; 4 drops from 5 caches).
It seems that potion and food drops don’t take your class into account, so that I get mana potions and food on my guardian as well. (Initially I thought that food drops take your class into account, but eventually I started getting mana food on my guardian as well; perhaps it was just a matter of randomness or they may have changed that in 4.1.5 or thereabouts.)
From the money drops seen so far, it seems pretty reasonable to conclude that the amount of money in each money drop is distributed uniformly in the range [1, 5] silver. (The actual minimum and maximum I’ve seen were 1.0062 and 4.9796 silver.)
Acheronian Cache (blue)
Here are the results based on 361 drops from 260 caches. Like with the green caches above, the number of drops per cache seems to have been increased in Update 5.0. Before that update, I got 1 or 2 drops per cache (1 drop 165 times; 2 drops 85 times); after that, I got from 2 to 4 drops per cache (2 drops 6 times; 3 drops twice; 4 drops twice).
| What | How many times it dropped |
|---|---|
| money (19–50 silver) | 22 |
| Food: | 47 |
| 2 Ta Neheh Leaf Elixir | 27 |
| 2 Kingsmight Ale | 20 |
| Blue potions: | 6 |
| 2 Dire Sweetpressed Haste | 6 |
| Green armor: | 37 |
| Pharaoh’s Guard Armplates | 6 |
| Pharaoh’s Guard Boots | 4 |
| Pharaoh’s Guard Gloves | 5 |
| Pharaoh’s Guard Goldmail | 6 |
| Pharaoh’s Guard Helm | 9 |
| Pharaoh’s Guard Shenti | 2 |
| Pharaoh’s Guard Sleevelets | 5 |
| Blue armor: | 185 |
| Belt of Red Ruin | 14 |
| Belt of the Fallen Empire | 21 |
| Greaves of Red Ruin [feet] | 23 |
| Greaves of the Fallen Empire | 23 |
| Rerebrace of Red Ruin [shoulder] | 25 |
| Rerebrace of the Fallen Empire | 23 |
| Tasset of Red Ruin [legs] | 29 |
| Tasset of the Fallen Empire | 27 |
| Purple armor: | 7 |
| Gloves of Red Ruin [hands] | 1 |
| Vambrace of Red Ruin [wrist] | 2 |
| Vambraces of the Fallen Empire | 4 |
| Buffs: (41× Elixir, 6× Refined Elixir, 2× self-rez) | 49 |
| Elixir of Brute Force [366 combat rtg] | 7 |
| Elixir of Guile [73 crit rtg] | 8 |
| Elixir of Invigorative Rejuvenation [15 nat stam regen] | 13 |
| Elixir of Precision [73 hit rtg] | 13 |
| Refined Elixir of Brute Force [732 combat rtg] | 1 |
| Refined Elixir of Guile [183 crit rtg] | 1 |
| Refined Elixir of Invigorative Rejuvenation [30 nat stam regen] | 1 |
| Refined Elixir of Precision [183 hit rtg] | 3 |
| Minor Elixir of Resurgence [self-rez] | 2 |
| Pets: | 8 |
| Mini-Pet: Acheronian Bloodletter | 1 |
| Mini-Pet: Acheronian Ritualist | 2 |
| Mini-Pet: Demigod | 2 |
| Pet: Living Statue | 3 |
Regarding money drops, the ones I’ve seen so far lead me to believe that the amount is uniformly distributed in the range [19, 50] silver or so. The average of the drops I’ve seen so far is 34.19 silver. The only problem here is that my notes show drop drops far outside this range, namels 10.4923 and 10.8027, but that might well be an error in my notes. Apart from those two outliers, the lowest drop I’ve seen is 19.4109 and the highest is 49.3365.
I’m surprised that I got blue stamina potions (Dire Sweetpressed Haste) but no blue health potions (Potent Daggamalt). Mystical caches drop both, as we’ll see below.
The elixirs shown above are what you can get on a guardian; other classes get whatever is suitable for them (e.g. (Refined) Elixir of Mystical Excellence for mages).
Mystical Acheronian Cache (purple)
Here are the results based on 249 drops from 209 caches. Before Update 5.0, I was getting from 1 to 3 drops per cache (1 drop 172 times; 2 drops 30 times; 3 drops once); after that update, I got 2 or 3 drops per cache (2 drops 4 times; 3 drops twice).
| What | How many times it dropped |
|---|---|
| Blue potions: | 14 |
| 5 Potent Daggamalt | 8 |
| 5 Dire Sweetpressed Haste | 6 |
| Purple armor: | 53 |
| Breastplate of Red Ruin | 2 |
| Cuirass of the Fallen Empire [chest] | 5 |
| Gauntlets of the Fallen Empire | 6 |
| Gloves of Red Ruin | 9 |
| Helm of the Fallen Empire | 5 |
| Mask of Red Ruin | 4 |
| Vambrace of Red Ruin [wrist] | 10 |
| Vambraces of the Fallen Empire | 12 |
| Other purple bind-on-pickup gear: | 12 |
| Clasp of the Fallen Empire [necklace: 68 str, 37 hate inc rtg, 192 protection] | 1 |
| Emblem of Red Ruin [necklace: 86 str, 42 con, 18 hate dec rtg, 67 crit dmg rtg] | 4 |
| Trinket of Old Acheron [necklace: 534 combat rtg, 50 fatality rtg, 28 hate dec rtg, 67 crit dmg rtg] | 3 |
| Ring of Ancient Python [52 con, 52 hit rtg, 267 protection] | 1 |
| Ring of the Fallen Empire [80 str, 50 con, 35 hate inc rtg] | 2 |
| Claw of the Death Master [1hb: 116.1 dps, 86 str, 47 hit rtg, 47 crit rtg, 55 crit dmg rtg] | 1 |
| Purple bind-on-equip gear: | 3 |
| Fellblade of Crimson Slaughter [2he, boe: 132.4 dps, 42 str, 91 magic dmg (fire), 337 combat rtg (2he), 38 hit rtg, 72 crit rtg, 12 hate dec rtg, 90 crit dmg rtg, 18 mana tap rtg] | 1 |
| Fellhammer of the Sanguine Disciple [2hb, boe: 133.3 dps, 67 str, 45 con, 391 combat rtg, 38 hit rtg, 60 crit rtg, 90 crit dmg rtg] | 1 |
| Heater-Shield of the Fallen Empire [shield, boe: 890 armor, 36 str, 52 con, 24 hate inc rtg] | 1 |
| Buffs: (38 Refined Elixir, 99 Refined Philtre, 18× self-rez) | 155 |
| Refined Elixir of Brute Force [732 combat rtg] | 8 |
| Refined Elixir of Guile [183 crit rtg] | 9 |
| Refined Elixir of Invigorative Rejuvenation [30 nat stam regen] | 9 |
| Refined Elixir of Precision [183 hit rtg] | 12 |
| Refined Elixir of Strength [183 hit rtg] | 1 |
| Refined Philtre of Constitution [+5% con] | 47 |
| Refined Philtre of Strength [+10% str] | 52 |
| Minor Elixir of Resurgence [self-rez buff] | 18 |
| Pets: | 7 |
| Pet: Scorpion Archer | 3 |
| Mini-Pet: Un Nefer | 2 |
| Mini-Pet: Scorpion Abomination | 2 |
| Other: | |
| Phial of Tranquility [1 Expertise point] | 5 |
One particularly annoying detail: not one, but TWO hate decrease necklaces (both bind-on-pickup, of course) can drop for a guardian. Perhaps they were inspired by John Donne‘s bitter but delightfully snarky lines:
My constancy I to the planets give;
My truth to them who at the court do live;
My ingenuity and openness,
To Jesuits; to buffoons my pensiveness;
My silence to any, who abroad hath been;
My money to a Capuchin:
Thou, Love, taught’st me, by appointing me
To love there, where no love received can be,
Only to give to such as have an incapacity.
On my ToS, I got an Amulet of the Hell Walker and Aegis of the Blood God; on my assassin, I got an Amulet of Ancient Python.
Mystical Excavator’s Kit (purple)
These are the purple caches that you get as a quest reward for the excavator quest (to clear Ardashir Fort, Vile Nativity, Sepulcher of the Wyrm, and the Coils of Ubah Kan). Here are the results after opening 99 purple caches on my guardian, for a total of 120 drops. All this was before Update 5.0; there were 1 or 2 drops per cache (1 drop 78 times; 2 drops 21 times). I haven’t opened any caches of this type after 5.0 yet, so I don’t know if the number of drops has been increased here as well.
| What | How many times it dropped |
|---|---|
| Blue potions: | 8 |
| 5 Potent Daggamalt | 6 |
| 5 Dire Sweetpressed Haste | 2 |
| Purple bind-on-pickup weapons: | 8 |
| Arakh of the Archaeologian [1he, bop: 117.6 dps, 83 str, 50 hit rtg, 34 crit rtg, 34 hate inc rtg, 47 crit dmg rtg] | 4 |
| Halberd of the Archaeologian [polearm, bop: 142.7 dps, 169 str, 221 combat rtg, 100 hit rtg, 86 crit rtg, 55 hate inc rtg, 123 crit dmg rtg] | 4 |
| Purple bind-on-equip weapons: | 4 |
| Fellhammer of the Sanguine Disciple [2hb, boe: 133.3 dps, 67 str, 45 con, 391 combat rtg, 38 hit rtg, 60 crit rtg, 90 crit dmg rtg] | 1 |
| Greatsword of the Death Master [2he, boe: 131.3 dps, 123 str, 169 combat rtg (2he), 35 hit rtg, 70 crti rtg, 100 crit dmg rtg] | 1 |
| Partizan of Red Ruin [polearm, boe: 135.8 dps, 50 str, 40 con, 7.7 nat stam regen, 409 combat rtg, 50 hit rtg, 75 crit rtg, 80 crit dmg rtg] | 1 |
| Scimitar of Red Ruin [1he, boe: 111.7 dps, 60 str, 84 combat rtg (1he), 30 hit rtg, 20 crit rtg, 40 crit dmg rtg, 21 offhand rtg] | 1 |
| Buffs: (36× Refined Elixir, 43× Refined Philtre, 6× self-rez) | 79 |
| Refined Elixir of Brute Force [732 combat rtg] | 13 |
| Refined Elixir of Guile [183 crit rtg] | 2 |
| Refined Elixir of Invigorative Rejuvenation [30 nat stam regen] | 10 |
| Refined Elixir of Precision [183 hit rtg] | 11 |
| Refined Philtre of Constitution [+5% con] | 17 |
| Refined Philtre of Strength [+10% str] | 26 |
| Minor Elixir of Resurgence [self-rez buff] | 6 |
| Pets: | 11 |
| Companion: Atlantean Shade | 2 |
| Companion: Excavator | 1 |
| Mini-Pet: Deep Walker | 1 |
| Mini-Pet: Forsaken Child of Yig | 3 |
| Mini-Pet: Queen Cao-Polyphya | 1 |
| Mini-Pet: Serpent Man Underling | 1 |
| Pet: Atlantean Shade | 1 |
| Pet: War Rhino Calf | 1 |
| Other: | |
| Phial of Tranquility [1 Expertise point] | 4 |
The Halberd of the Archaeologian uses the same model as Polearm of the Black Pharoah (from Coils of Ubah Kan).
The Partizan of Red Ruin uses the same model as Blighted Halberd (from Xibaluku) and Imperial Acheronian Halberd (from the Iron Tower). A recolored version of the same model is also used for the Whispering Touch (T3 crafted polearm).
In terms of stats, the bind-on-pickup polearm (Halberd of the Archaeologian) is very nice; basically the same stats as on the T4 polearm, just in slightly lower amounts. The bind-on-equip polearm (Partizan of Red Ruin) is much less attractive; compared to other purple polearms in the game, it’s low on strength and constitution and it seems to be a bit more dps-oriented. I guess you could say it’s somewhere on the level of T1/T2 polearms. At least it’s better than the other bind-on-equip purple polearms (The Herald of Blight, Return of Time).
On my necro, this type of cache also dropped a Dagger of the Archaeologian (BoP).
For a complete list of the various purple weapons and accessories that are available from the Mystical caches (of both types), see AoC > TV.
Item shop revamp in update 4.10
Funcom’s approach to monetizing AoC has been despicably greedy ever since they first introduced the item shop about a year after launch. But with today’s changes, they have surpassed my wildest fears. All vanity items and a great many other things have been removed, prices on many of the remaining items have been increased dramatically, and you can now buy full sets of T3 armor as well as treasure chests which have a chance of dropping T4 and T5 raid tokens (rare as well as common ones).
And meanwhile the community manager has the unspeakable, bald-faced impudence to say that they only “streamlined the item shop and removed some clutter”!

Fuck off and die, Failcom, you worthless, pathetic excuse for a game company.
Bloodhunter cloth armor
This is one of the armor sets that were introduced with the unchained dungeon system and parts of it drop from the various boxes that you get there, either as direct drops from bosses or as quest rewards from the quest to clear all 4 unchained dungeons. Bloodhunter is the assassin set.
One of the many wonders of Funcom’s software development is that somehow they manage to make some items look vastly different on the character selection screen than they do in game. This set is one of them. On the character selection screen, it has a hideous combination of colors, some parts are purplish and some are a sort of greyish green that can best be described as puke-colored:


Looks like a cosplay effort gone horribly wrong.
Fortunately, in game it looks almost completely black instead. That’s much better and especially suitable for an assassin:


And it looks even better without the headpiece and the belt 🙂


I was quite lucky with this set; I got the whole set after doing just 3 full unchained runs (i.e. where each run consisted of all four unchained dungeons), whereas on my guardian it took me about 12 runs to finish collecting the full-plate set and over 30 runs for the heavy set.
The HoX unchained set (Crimson Slaughter) looks exactly the same, as far as I know. And the demo/necro set (Hell Walker) looks the same too, except for the fact that it isn’t (nearly) black in game — it’s vomit-colored, same as on the character selection screen (another way to describe this set is by saying that it’s worn by Black Ring Reanimator mobs in BRC Wing 2).
So I’m half afraid that one fine day, someone at Funcom will decide that the badass black color of the HoX and sin sets is really a bug, and the set will be ‘fixed’ into having the same vomit color that the demo/necro set already has now.
Since all parts of the unchained armor sets are bind-on-pickup, the various caches only drop items from sets that are suitable to your character’s class. If you want to wear this stuff on a character from some other class, one possible option might be to farm Caravan Raiders Hideout in normal mode (i.e. not unchained). The bosses there can drop items that have the same names and appearance as those from the unchained armor sets, but not the same stats (for example, items from CRH normal mode don’t have any critigation). Another difference is that in the unchained sets, hands are always purple, but in CRH normal mode the hands are blue. I don’t know if the drops in CRH normal mode cover all possible locations; I’ve seen hands, belts and feet so far, but admittedly I don’t do CRH normal mode much.
Steel Behemoth plate set
Steel Behemoth is one of the two T6 full-plate sets. I recently got the last piece I was missing from it, so here’s a screenshot of the whole set:
If you went on a safari wearing this stuff, you’d either get molested by a rhino or shot at by poachers 😛
I actually rather like the look of most of the T6 raid armor sets, and I’m glad that the developers took the trouble to design new sets rather than just recolor old ones like they did in T5. Of course, they had to cut some corners anyway, and so for example the other T6 plate set (Warded Brute, the protection set) looks the same as this one, just in a different color (a kind of violet). One minor complaint is that for a full-plate set, it sure doesn’t look very plate-y. In fact the chest piece is delightfully revealing:

There are of course the inevitable clipping issues, or in case of the dangly bit in the front (which is part of the leg piece), they aren’t so much issues as lifetime subscriptions and charter memberships 😛 Still, overall I’m definitely happier with the look of this set than I was with the T5 set.
In terms of stats, Steel Behemoth is a physical tanking set, with an emphasis on armor and HP; thus, it’s similar to the Courageous Souls set from T4, but with most attributes increased by 5–10% (the DPS and critical damage rating got a more substantial increase). In addition, wearing T6 armor gives you a buff called Emerald Lotus Coating, whose strength depends on how many T6 armor pieces you’re wearing:
- 2–3 items: 220 armor penetration, 152 spell penetration, 158 tenacity
- 4–5 items: 470 armor penetration, 330 spell penetration, 340 tenacity
- 6–7 items: 845 armor penetration, 590 spell penetration, 610 tenacity
- 8 items: 1250 armor penetration, 875 spell penetration, 900 tenacity
In addition, the buff includes some negative PvP stats to make T6 armor unattractive in PvP. For PvE, my understanding is that tenacity is only useful in T6 for now, since that’s the only place where mobs have critigation. Armor and spell penetration might also be useful in some lower raid tiers where the mobs have a lot of armor and protection (see also this interesting recent forum thread about penetration stats).

Penetration FTW!
The Rare Panda of Chosain
A rare panda boss spawns in Chosain, just southwest of the bamboo grove in the central part of the playfield (the one where you go as part of the quest chain to obtain your tiger mount from the Tamarin Tigers faction). I first heard of it (and of the unique thrown weapon that drops from it) when people were talking about it in the comments of my “About” page; since then I occasionally rode past that bamboo forest on purpose every now and then but never had any luck seeing it. So, more recently, I decided to look for it a little more deliberately, and yesterday I finally found it.

Take that, WWF!
There is a tiger mob (Wildwood Stalker) patrolling slowly south of that bamboo grove. If you kill it, it can take quite a long time to respawn, up to 2.5 hours when I was killing it. The impression I have is that this mob is a placeholder for the panda boss, so when you kill it (or you enter a new instance of the playfield), there’s a small chance that the panda boss will spawn in its place instead of a new tiger. The patrolling tiger spawns around (455, 755) and then moves in a sort of rectangle south and east of there.
So getting the panda to appear seems to be mostly a matter of killing that tiger again and again, and waiting for a very long time between the respawns. I was mostly standing at the nearby rock at (435, 775) and waiting, alt-tabbed away from the game. When the tiger respawns, its patrol route will soon bring it close enough to this location that it will aggro you, so I was simply standing there in defensive stance and checking back every few minutes to see if the tiger showed up or not. With some luck, I found find it nibbling on my guardian so I could kill it, but sometimes it had already managed to kill me by the time I got back into the game.
On one occasion I found my guardian dead but the combat log showed that she had been getting hit by a Panda, not by the Wildwood Stalker, which confirmed that I was on the right track 🙂 Unfortunately, the panda had already despawned by then. After another day or two of waiting, I finally got lucky and alt-tabbed back into the game just as the panda was attacking me, so I could finally kill it.
The Panda was a level 83 boss and according to my combat log, it had around 22225 HP, which is just as one would expect from a level 83 Khitai boss. There’s a nice video on youtube where someone’s fighting the panda on a barbarian and almost gets killed by it 🙂 so I was sort of expecting a harder fight than it turned out to be. (Incidentally, that video also shows that the panda appears in a sort of impromptu miniature bamboo grove, which then promptly disappears. I didn’t see that one myself, probably because it was already gone by the time I had alt-tabbed back into the game.)


The panda boss does have a few interesting abilities: occasionally it casts a buff called Bamboo Grove (+20% evade chance, +50 damage deflection for 20 sec) and eventually it got another buff called Shadow Style (-30% movement multiplier, +50% damage multiplier for 25 sec). Its white hits are crushing damage, but it also has an attack called Bamboo Paddle, which does slashing damage. When you kill it, you get a 12-hour debuff called Panda Killer (-500 charisma), same as from killing the panda pet in the new Pit Master’s Arena. (Charisma, of course, is a joke stat that doesn’t actually do anything. IIRC it appears in some other places in the game, possibly from one of the whores in Tarantia Common District.)

Another interesting thing about the panda boss is that it drops a thrown weapon called Bamboo Javelin with a unique 3-d model. Thrown weapons, of course, are largely a joke as well; they had some use in the very early times of the game, when most classes couldn’t use bows or crossbows until level 40, soldiers didn’t have the Irritate ability yet, so for some classes a thrown weapon was the only way they could pull a mob from range. But after these things were changed in update 1.05 or so, thrown weapons are mostly interesting as some sort of easter eggs, and by the time the Khitai expansion was released, the devs seemed to see them in such a light as well.

There is another famous joke thrown weapon in Khitai, namely The Rock (which drops from the somewhat uncommon mini boss in the Den of the Crowmen). I was naturally curious how the stats on these two thrown weapons compare. It turns out that The Rock is very defensively oriented (306 armor, 130 con, 99 hit rtg, but only 35.1 DPS) whereas the Bamboo Javelin is much more aggressive (62.3 DPS — twice as much as The Rock! — 86 hit rtg, 89 crit rtg, 93 crit dmg rtg, 61 hate increase rtg).

Khitai world-drop blues
The introduction of the achievement system in update 4.5 has been an unexpected boon for my efforts to catalogue the world-drop blue loot. (For my previous posts in this series, see: level 10–19, level 20–39, level 40–49).
A large number of (moderately) rare open-world bosses were introduced for the Bane achievements, and these bosses always drop a piece of blue BoE loot, even in normal-mode playfields. The two big differences between them and the traditional open-world bosses that we’ve known since release are the following:
(1) From the traditional bosses, a blue drop is only guaranteed if you kill them in an epic instance; in a normal instance, a blue drop is very unlikely. By contrast, the new achievement bosses always drop a blue item, even in a normal instance.
(2) From level 40 up, the loot tables of the traditional bosses include 12 armor sets (see my old posts for screenshots: level 40–69, level 70–80), which account for around 90% of the items in these loot tables. So if you’re only interested in farming the other items, those which aren’t part of the sets, you’ll have to kill the bosses a lot more times than on lower levels because most of the time they’ll be dropping the set pieces that you don’t care about. The new achievement bosses don’t have these 12 armor sets in their loot tables, so the problem is gone.
This makes the new achievement bosses very attractive for farming the open-world blue loot. They do have one disadvantage, however: they are, in principle, rare — you have to kill a placeholder mob and hope that your boss will then spawn in its place. But in practice, they aren’t *that* rare, so farming them isn’t that much of a problem.
When the Khitai expansion was released, the old open-world blue drop system was extended with a number of new level 80 items — armor pieces (which do not form complete sets), weapons, and accessories. Unlike in the old world, these items did not drop directly from bosses, but had a small chance of dropping from various bags which you could get as random drops from mobs (not just bosses) or as quest rewards. I got a few blue items that way, but the drop rate is very low, and there was simply no practical way for an individual player to explore the whole loot table.
But now, these Khitai blue BoE items also drop from the new achievement bosses in Khitai and the Dragon’s Spine, so they are quite easy to farm and I was able to explore the loot table in the same way as in my earlier posts for low-level open-world BoE blues; I kept killing the bosses until I had seen each item drop at least five times. Who knows, I just might eventually do the same for old-world level 50–80 blue drops.
| Name | Level | Description |
|---|---|---|
| Administer’s Gloves | 80 | light hands, magic dmg |
| Band of Introspection | 80 | str/con ring |
| Bands of Consequence | 80 | heavy shoulder, str/con |
| Belt of Adulation | 80 | cloth belt, str/con |
| Bracers of Evaluation | 80 | light wrist, magic dmg |
| Bracers of Quick Study | 80 | ranger wrist |
| Ceremonial Blade | 80 | 1he, wisdom |
| Cloak of Flourishes | 80 | cloak, magic dmg |
| Dagger of the Ninth Rank | 80 | dagger, magic dmg |
| Dragon Grips | 80 | plate hands, str/con |
| Drape of the Headless Man | 80 | cloak, combat rtg |
| Examiner’s Skirt | 80 | cloth legs, magic dmg |
| Exemplar’s Breastplate | 80 | plate chest, str/con |
| Girdle of Courage | 80 | heavy belt, str/con |
| Gloves of Remark | 80 | light hands, str/con |
| Greaves of the Bold | 80 | plate feet, str/con |
| Hammer of Fortunes | 80 | 2hb, con, combat rtg |
| Harmonious Sword | 80 | 2he, con, combat rtg |
| Heirloom of the Barren Line | 80 | DT talisman |
| Helm of the Wise One | 80 | medium head, wisdom (WTF?!) |
| Helm of Tribute | 80 | ranger head |
| Hoop of the Fox Demon | 80 | ring, magic dmg |
| Intruder’s Wrist-straps | 80 | light wrist, str/con |
| Lance of the Province | 80 | 2hb, con |
| Lively Bands | 80 | ranger shoulder |
| Martial Blade | 80 | 1he, con, combat rtg |
| Master’s Bolts | 80 | xbow bolts |
| Mysterious Necklace | 80 | necklace, magic dmg |
| Officer’s Chestplate | 80 | heavy chest, str/con |
| Pendant of Longevity | 80 | necklace, str/con |
| Prefect’s Hammer | 80 | 1hb, hate inc |
| Red Fletched Arrows | 80 | bow arrows |
| Ring of Leverage | 80 | ring, combat rtg |
| Shield of the Scale Mountain | 80 | shield, con |
| Shirt of Contention | 80 | light chest, str/con |
| Shoes of the Long Road | 80 | cloth feet, magic dmg |
| Silent Treads | 80 | cloth feet, dex |
| Skirt of Sustaining Fire | 80 | cloth legs, str/con |
| Soulkindle | 80 | 2he, HoX |
| Staff of Justice | 80 | staff, mage or priest |
| Steward of Secrets | 80 | dagger, combat rtg |
| Stifling Cord | 80 | cloth belt, dex |
| Survivor’s Luck | 80 | necklace, combat rtg |
| Swordsman’s Shoes | 80 | HoX feet |
| The Fifth Arm | 80 | guardian polearm |
| The Rose’s Bloom | 80 | crossbow |
| The Subtle Disguise | 80 | assassin legs |
| The Two Cranes | 80 | medium wrist, con |
| Thickened Silk Rope | 80 | cloth belt, magic dmg |
| Tightly-woven Armbands | 80 | BS shoulder |
| Truncheon of the Lawgiver | 80 | 1hb, magic dmg |
| Tunic of Talent | 80 | light chest, magic dmg |
| Waterbuffalo Horn Bow | 80 | bow |
| Wind of Battle | 80 | cloak, str/con |
| Wise Man’s Trinket | 80 | talisman, int |


An interesting difference compared to the old-world BoE blues is the absence of procs on these new ones — things like retortive revenge, sacrarial guard, and countless others. Such procs were a prominent feature of AoC combat and itemization at release; they were present on many pieces of gear and you could also get them from crafted gems. Later the developers seemed to change their mind; from the big changes in update 1.05 onwards, procs of that sort are more or less irrelevant, and none of the items added since then (including anything from the Khitai expansion) have them.
Zhu-Khang joins the Steam marketing team
This is not strictly speaking an AoC post but I found it funny so I’ll post it anyway. Zhu-Khang is the NPC in Tarantia Noble District who offers to sell you thirty gold for the low price of forty gold. I was reminded of him when I saw the following package deal on Steam:

